Today’s Photo of the Week popped back up on my radar recently as it’s being printed on perspex to be hung in an office in Glasgow.
It might not be obvious at first glance that this was shot at about 11pm on a clear moonlit night but if you look at the blurred blades on the wind turbines and the EXIF data the clues are there. The only post production here is a little noise reduction.
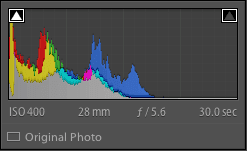
You can see this was shot at a 30 seconds – the longest exposure without going into Bulb mode. ISO and aperture were set to made a good exposure at that time after a few practise shots.
This is one of those histograms that don’t fit the mould. The data is bunched at the left side but that’s what you’d expect from a moonlit image – it’s naturally going to be dark and low contrast.
Gear wise, this needed nothing more than a tripod. I didn’t even have my shutter release with me so I just used the cameras self timer.
If you’ve spent any time on my blog, you’ll know I like shooting on location. I love all the choices I get when it comes to balancing strobes with the available light – juggling all the variables is so much more fun than shooting in a studio where you have complete control over the lighting.
Shooting at night takes that to the extreme. Capturing what little ambient there is can be tricky when your flashes want to nuke everything with light.
I came up against such a situation a couple of weeks ago, so here’s what I did to stop my model, Sarah, from floating in a sea of under exposed blackness.
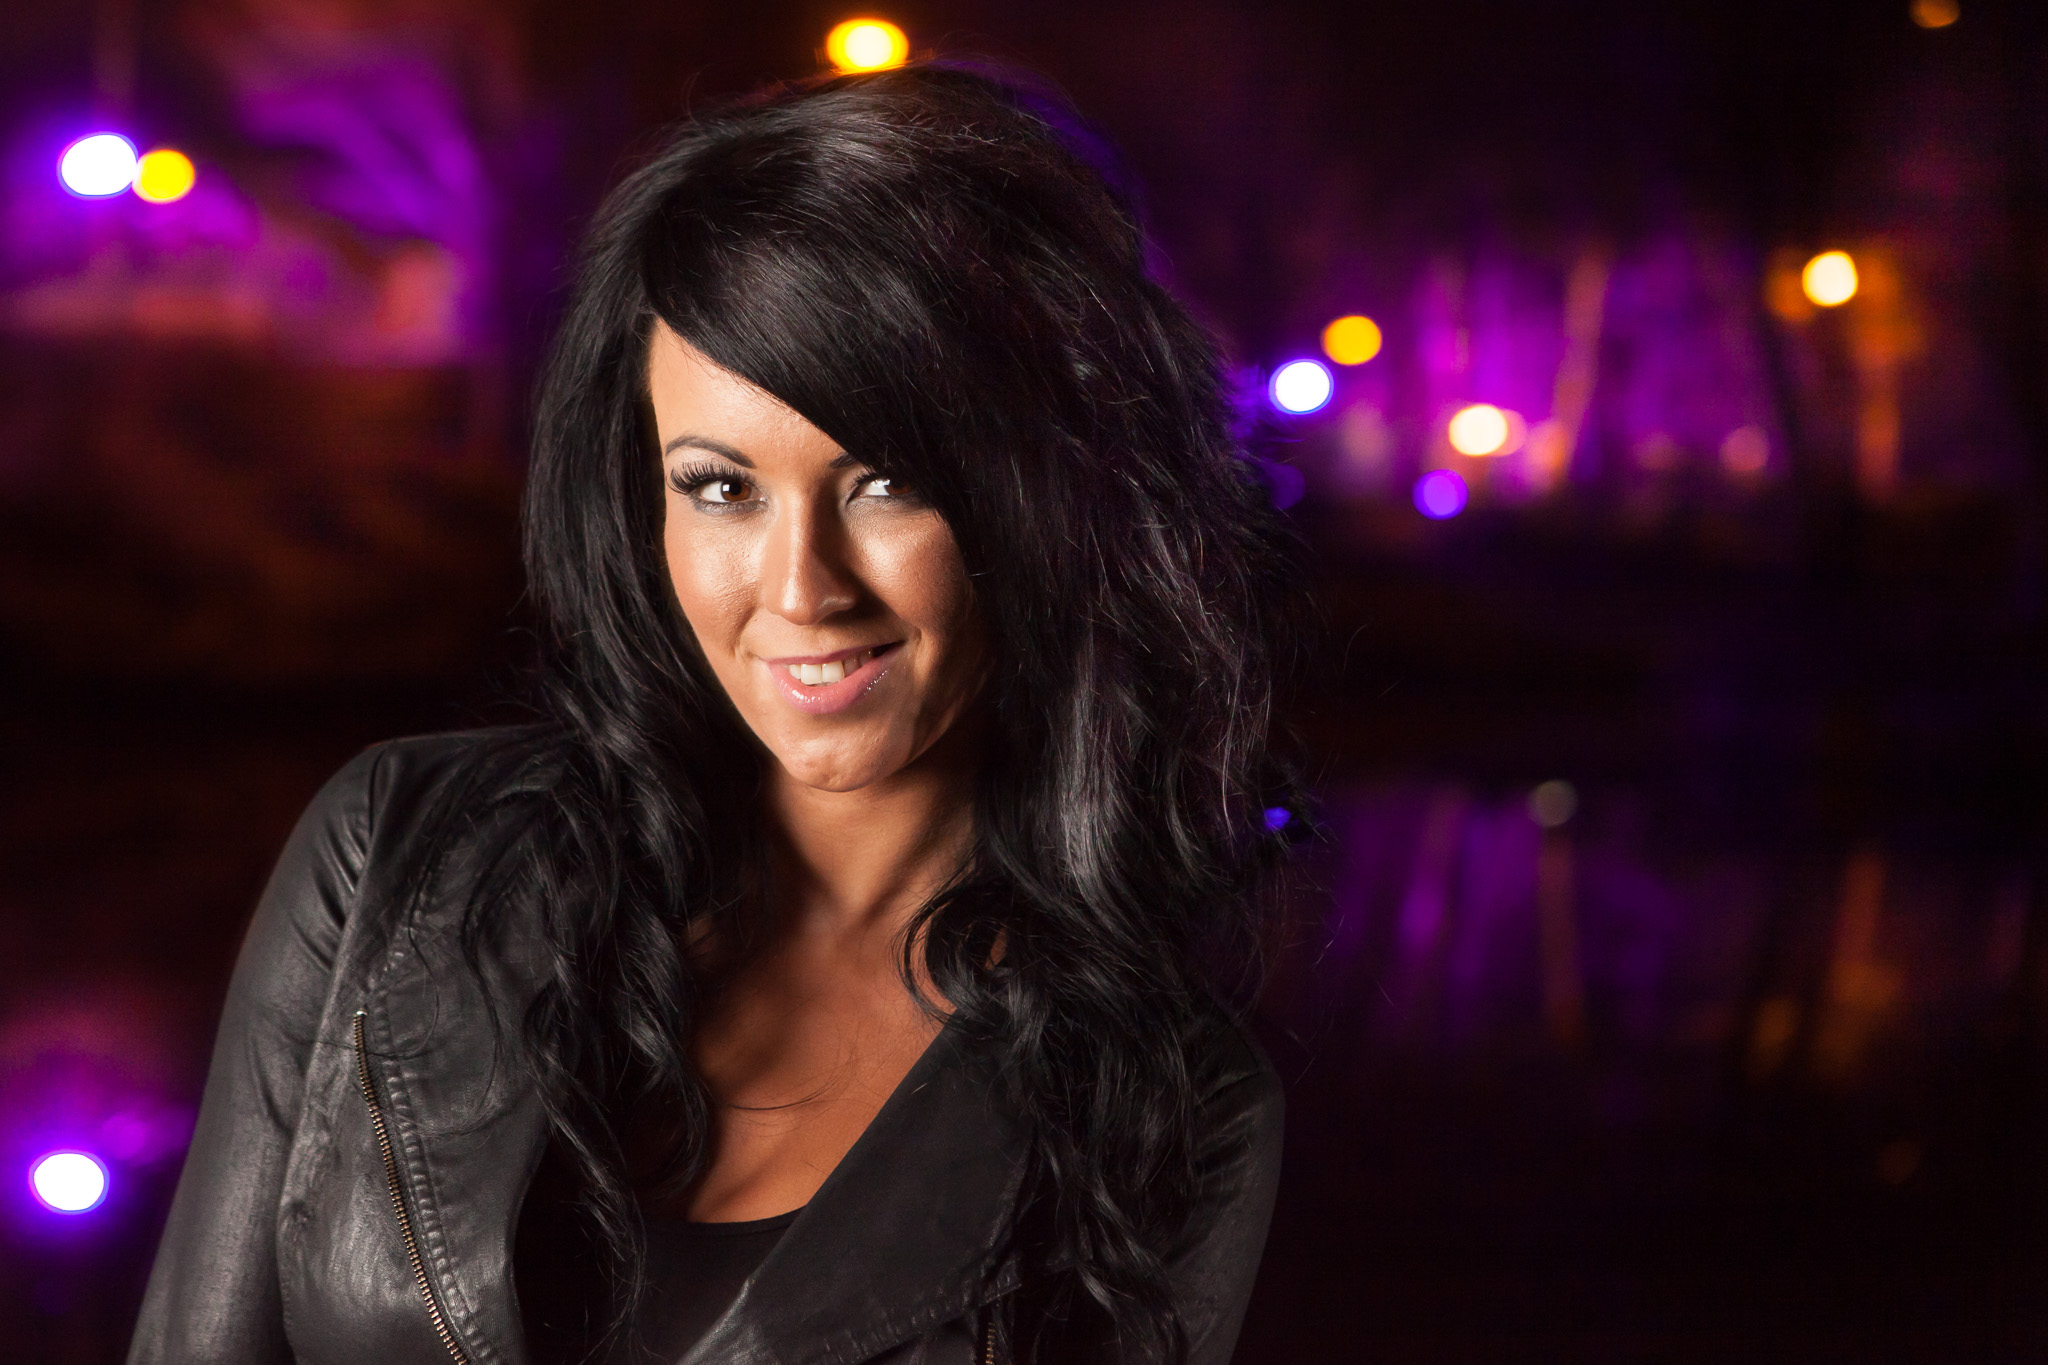
The image above was taken out by Pendigo Lake at the NEC near Birmingham in pitch darkness. So dark in fact that I had to ask friends to light the area with mobile phones while I set up. Without some artificial light on her, Sarah wouldn’t register at all.
Before the Quadras got powered on though, I found my ambient exposure. If I went straight in with flash, I’d have ended up with a good exposure on Sarah but a dark background. I wanted the coloured lights on the other side of the lake as my background so I left the strobes off for now, slowed my shutter speed and cranked up my ISO. The sweet spot turned out to be 1/20th second, f/4 at ISO 1600. Obviously shooting 1/20th handheld is usually a no no but when using strobe, the very short duration of the flash will freeze anything it hits. Plus, as there was no ambient light falling on her, I knew Sarah was going to be free from any motion blur from camera shake.
Then came the lighting on Sarah: A Westcott 50″ Apollo softbox (review of this coming soon) camera right and a gridded strobe camera right, slightly behind her.
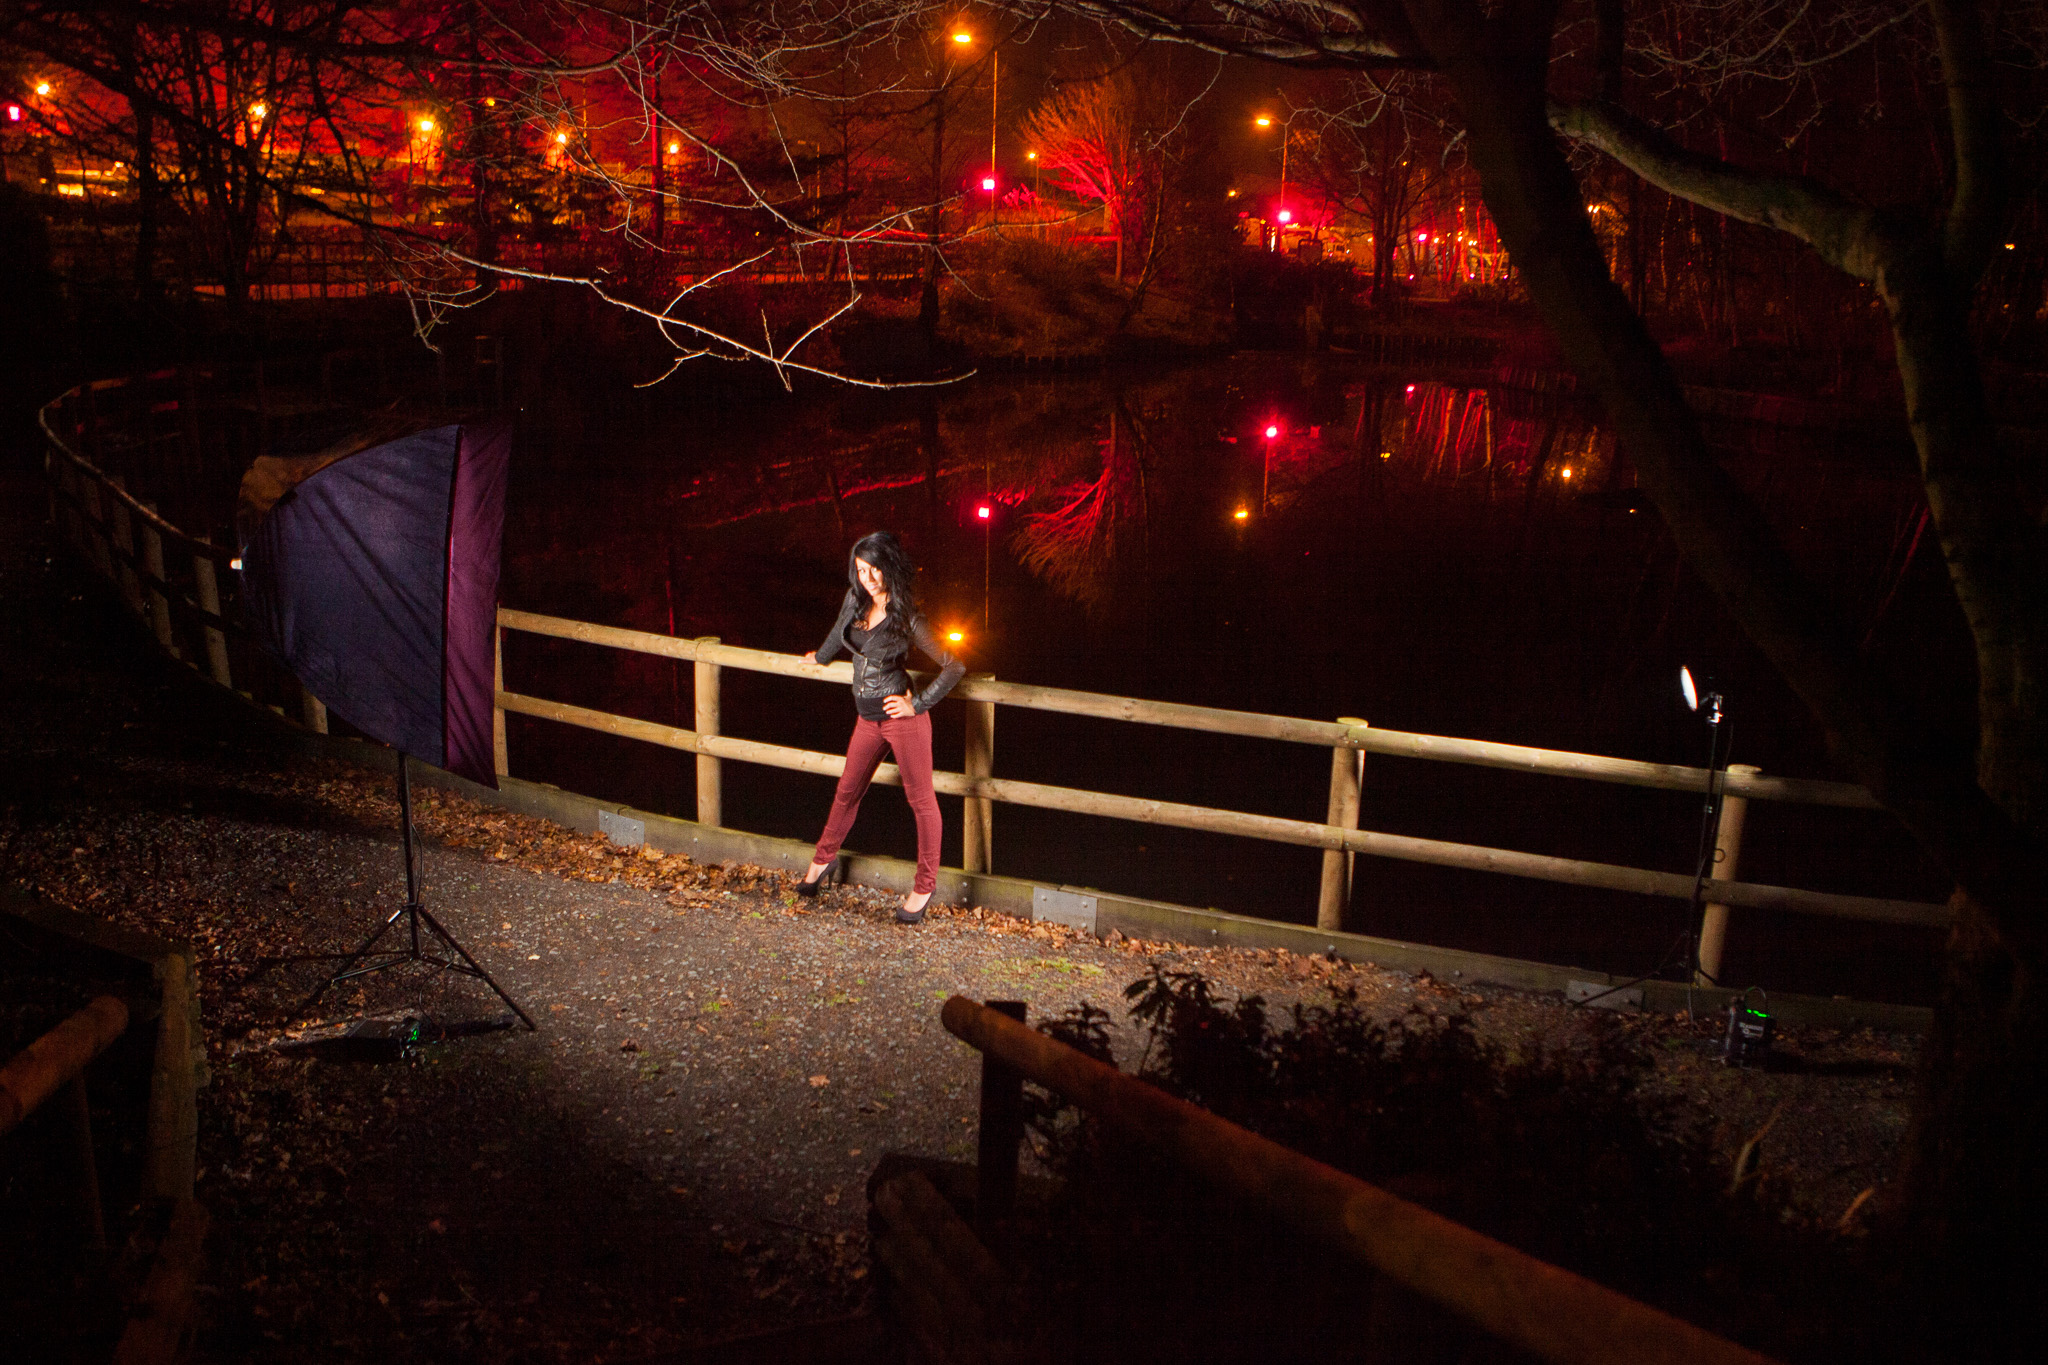
As you have to start somewhere I set both packs to 1/4 power and fired off a test – let’s just say it was a little over exposed! Even at minimum power (25 w/s) on the ‘A channel’ on the packs I was still going to end up with a glowing Sarah if I wanted to keep the detail in background. I could have closed my aperture or lowered my ISO 2 stops to restrict the amount of flash getting in but that would have forced me to go to shutter of 1/5th of a second – slower than I was comfortable with.
So instead I switched my Quadra heads over to the packs “B channel” and dialed all they way down to 8w/s – just enough power to balance the ambient light and produce this set of images.
The word photography comes form the Latin ‘photo’ and ‘graphico’ and translates literally to “writing with light”. I took that literally this weekend and did some light painting. It was a full moon on a clear, frosty night and I happened to be staying in Wales, just a few miles from a small wind farm so the opportunity was too good to pass up.
Light painting is a simple idea and it doesn’t take much trial and error before you start getting good results. You will need your camera locked down for this as you are taking long exposure shots – in this case 30 seconds. A tripod is best but a bean bag on a car roof/gate post/sleeping cow would suffice.
Use your camera’s built-in meter and juggle your aperture and shutter speed until you get a good exposure. By “good” I don’t mean zeroed out on the scale in your viewfinder however. We are shooting at night here so obviously the shot is going to be dark and we will be painting in some extra light in the foreground so we need to stop the camera trying to make everything look like a mid grey. Minus 2 stops should be about right, but take full advantage of shooting digital and fire off a few test shots. You can shoot in Aperture Priority mode for this and use the +/- EV control or you can go Manual for more control or if you need an exposure longer than 30 seconds.
Once you are happy with the overall exposure, you can start adding light. This is where the trial and error comes in as this is no exact science and there’s no TTL – you are simply shining a torch on your subject. Obviously the bigger the subject and the further away it is, the more powerful torch, or longer exposure you’ll need.
For this example I was about 30m away from the wind turbine using a small, yet powerful and tightly focused LED torch.
About 5 seconds tracing the beam up and down the tower with the remaining 25 seconds spent highlighting the rotating blades seemed to yield the best results. As you can see from the image on the right, there is quite a marked difference when adding the light to the image.
Once I had this dialled in, I shifted my composition, gave things a little tweak in Lightroom and came up with the result below.


Recent Comments